[God Classroom] Easy Kubernetes Installation Guide
The installation of the K8S in the country has always been a headache for everyone. The key is not knowing what tools need to be downloaded. Egg pain. And most domestic tutorials are either too old or too frustrating. Come today to tell everyone how to install K8S in the country.
Installation Environment
The use of kubeadm to install, the process is basically installed by the official tutorial.
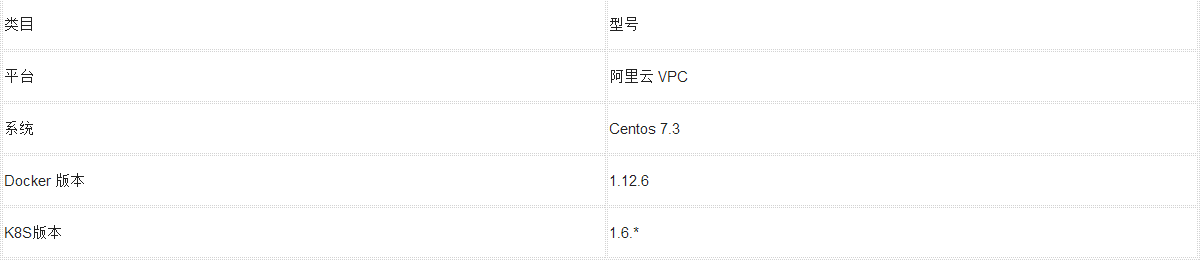
Although the Alibaba Cloud VPC is written, the virtual machine also supports it. Has little effect.
If you only play with a local installation, you can configure it as 1 core 1G.
In the next process, if there is a case of over-the-top hosting, follow the process and you can, if not, then you can directly read the downloaded results.
Installation process
The installation process basically includes downloading software, downloading images, host configuration, starting the master node, configuring the network, and starting the Node node.
Download software
People with this step can directly follow the steps. If not, they can use my packaged 1.6.2 package.
First configure the K8S source on your own host.
Cat <
After the configuration, download the software package
Yum install -y -downloadonly kubelet kubeadm kubectl kubernetes-cni
Package all downloaded RPMs and send them back to local. This completes the download of the K8S package.
Download RPM:
https://pan.baidu.com/s/1clIpjC cp6h
Download mirror
Downloading the image can use the script I provided directly, provided that I can connect to the external network. I have already downloaded one myself. For everyone to use.
#!/usr/bin/env bashimages=( kube-proxy-amd64:v1.6.2 kube-controller-manager-amd64:v1.6.2 kube-apiserver-amd64:v1.6.2 kube-scheduler-amd64:v1.6.2 kubernetes -dashboard-amd64:v1.6.0 k8s-dns-sidecar-amd64:1.14.1 k8s-dns-kube-dns-amd64:1.14.1 k8s-dns-dnsmasq-nanny-amd64:1.14.1 etcd-amd64:3.0 .17 pause-amd64:3.0) for imageName in ${images[@]} ; do docker pull gcr.io/google_containers/$imageName docker tag gcr.io/google_containers/$imageName registry.cn-beijing.aliyuncs.com/ Bbt_k8s/$imageName docker push registry.cn-beijing.aliyuncs.com/bbt_k8s/$imageNamedonequay.io/coreos/flannel:v0.7.0-amd64docker tag quay.io/coreos/flannel:v0.7.0-amd64 registry.cn- Beijing.aliyuncs.com/bbt_k8s/flannel:v0.7.0-amd64docker push registry.cn-beijing.aliyuncs.com/bbt_k8s/flannel:v0.7.0-amd64
I explain this script. This script is to download the commonly used image, and then pass it back to the domestic source. You can change registry.cn-beijing.aliyuncs.com/bbt_k8s to your own address. You must first log in with docker login. Otherwise, permission may appear. Bad authentication. Recommend using Alibaba Cloud, NetEase's service. If you use your own address, please pay attention to the following configuration, and modify it according to your own situation.
The mirror version number indicates:
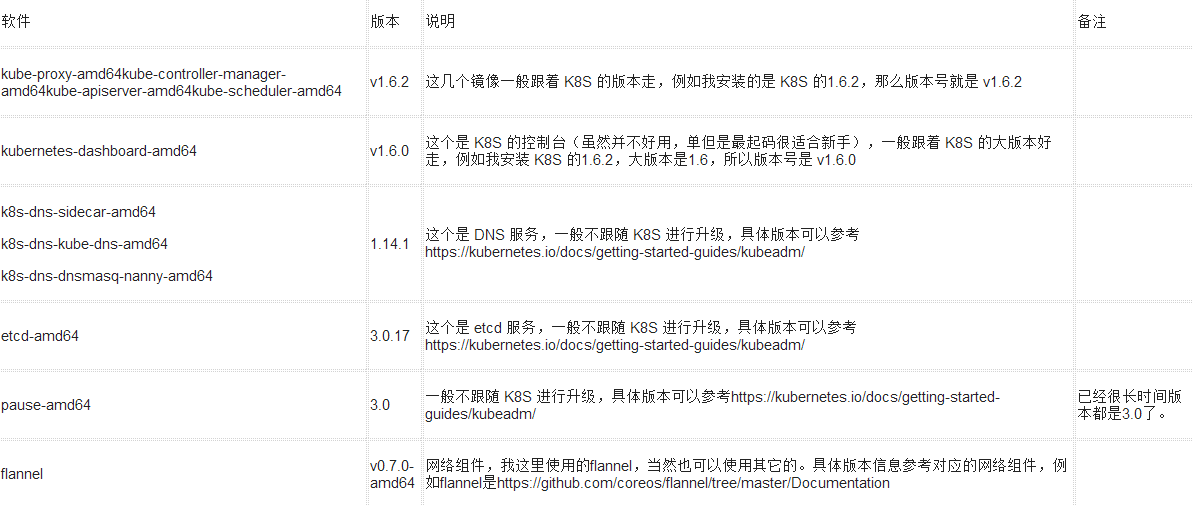
OK, the download of these images is OK. If you don't connect to the external network, skip it.
Host configuration
After the above content is downloaded, we can install it.
Update system
Nothing can be introduced.
Yum update -y
Install Docker
The 1.6.x version of K8S was only tested on Docker 1.12. Although the latest version of Docker can be run, it is not recommended to install the latest version to avoid any problems.
Curl -sSL http://acs-public-mirror.oss-cn-hangzhou.aliyuncs.com/docker-engine/internet | sh /dev/stdin 1.12.6
After the installation is complete, disable Docker's update. The disable method is to add in /etc/yum.conf
Exclude=docker-engine*
Configure Docker
The main thing is to configure some accelerators to avoid downloading images too slowly.
Modify /etc/docker/daemon.json to add the following:
{ "registry-mirrors": ["https://Own acceleration address"]}
After that, we started Docker’s service.
Systemctl daemon-reloadsystemctl enable dockersystemctl start docker
Modify the network
Mainly to open the bridging related support, this is the flannel required configuration, specifically whether it is necessary to see what their own network components choose.
Modify /usr/lib/sysctl.d/00-system.conf and change net.bridge.bridge-nf-call-iptables to 1. Then modify the current kernel state.
Echo 1 > /proc/sys/net/bridge/bridge-nf-call-iptables
Install K8S package
Upload the RPM package to your own server and execute
Yum install -y *.rpm
After starting kubelet boot start
Systemctl enable kubelet
Then configure the kubelet, modify /etc/systemd/system/kubelet.service.d/10-kubeadm.conf into the following file
[Service]Environment="KUBELET_KUBECONFIG_ARGS=--kubeconfig=/etc/kubernetes/kubelet.conf --require-kubeconfig=true"Environment="KUBELET_SYSTEM_PODS_ARGS=--pod-manifest-path=/etc/kubernetes/manifests --allow -privileged=true"Environment="KUBELET_NETWORK_ARGS=--network-plugin=cni --cni-conf-dir=/etc/cni/net.d --cni-bin-dir=/opt/cni/bin"Environment= "KUBELET_DNS_ARGS=--cluster-dns=10.96.0.10 --cluster-domain=cluster.local"Environment="KUBELET_AUTHZ_ARGS=--authorization-mode=Webhook --client-ca-file=/etc/kubernetes/pki/ca .crt"Environment="KUBELET_ALIYUN_ARGS=--pod-infra-container-image=registry-vpc.cn-beijing.aliyuncs.com/bbt_k8s/pause-amd64:3.0"ExecStart=ExecStart=/usr/bin/kubelet $KUBELET_KUBECONFIG_ARGS $KUBELET_SYSTEM_PODS_ARGS $KUBELET_NETWORK_ARGS $KUBELET_DNS_ARGS $KUBELET_AUTHZ_ARGS $KUBELET_EXTRA_ARGS $KUBELET_ALIYUN_ARGS
Mainly to fix two problems here, one is to modify the POD base container to our own source, the other is the latest version of the K8S resource management and Docker default resource management methods conflict, here to delete this block . Specific reference can be found at https://github.com/kubernetes/release/issues/306
Then re-reload the service.
Systemctl daemon-reload
This completes the initialization of the host environment. If you are using a virtual machine, copy 3 copies. If it is a physical machine, all three will follow this step. Then for each host, hostName is set according to the type. K8S will use HostName as host identifier.
Start Master
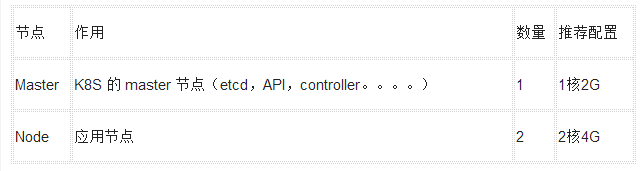
After configuring the host, we can start our Master node, usually the Master node is recommended 2-3, local testing we are simple, a node can be.
Export KUBE_REPO_PREFIX="registry-vpc.cn-beijing.aliyuncs.com/bbt_k8s"export KUBE_ETCD_IMAGE="registry-vpc.cn-beijing.aliyuncs.com/bbt_k8s/etcd-amd64:3.0.17"kubeadm init --kubernetes- Version=v1.6.2 --pod-network-cidr=10.96.0.0/12
The first two environment variables are configured to let kubeadm initialize and use our image source to download the image.
The last kubeadm init is to initialize the master node. Which I need to configure the parameters I explain.

After the execution is completed, wait a while and complete.
Kubeadm init --kubernetes-version=v1.6.2 --pod-network-cidr=10.96.0.0/12[kubeadm] WARNING: kubeadm is in beta, please do not use it for production clusters.[init] Using Kubernetes version: V1.6.2[init] Using Authorization mode: RBAC[preflight] Running pre-flight checks[preflight] Starting the kubelet service[certificates] Generated CA certificate and key.[certificates] Generated API server certificate and key.[certificates] API Server Cert is certified for DNS names [node0 kubernetes kubernetes.default kubernetes.default.svc kubernetes.default.svc.cluster.local] and IPs [10.96.0.1 192.168.61.41][certificates] Generated API server kubelet client certificate and key. [certificates] Generated service account token signing key and public key.[certificates] Generated front-proxy CA certificate and key.[certificates] Generated front-proxy client certificate and key.[certificates] Valid certificates and keys now exist in "/etc /kubernetes/pki"[kubeconfig] Wrote KubeConfig file to disk: "/e Tc/kubernetes/admin.conf"[kubeconfig] Wrote KubeConfig file to disk: "/etc/kubernetes/kubelet.conf"[kubeconfig] Wrote KubeConfig file to disk: "/etc/kubernetes/controller-manager.conf"[kubeconfig ]Wrote KubeConfig file to disk: "/etc/kubernetes/scheduler.conf"[apiclient] Created API client, waiting for the control plane to become ready[apiclient] All control plane components are healthy after 14.583864 seconds[apiclient] Waiting for at Least one node to register[apiclient] First node has registered after 6.008990 seconds[token] Using token: e7986d.e440de5882342711[apiconfig] Created RBAC rules[addons] Created essential addon: kube-proxy[addons] Created essential addon: kube-dnsYour Kubernetes master has initialized successfully!To start using your cluster, you need to run (as a regular user): sudo cp /etc/kubernetes/admin.conf $HOME/ sudo chown $(id -u):$(id -g ) $HOME/admin.conf export KUBECONFIG=$HOME/admin.confYou should now deploy a pod network to the cluster.Run "kubectl apply - f [podnetwork].yaml" with one of the options listed at: http://kubernetes.io/docs/admin/addons/You can now join any number of machines by running the following on each nodeas root: kubeadm join -- Token 1111.1111111111111 *.*.*.*:6443
After the installation is complete, it is very important to have a look at the installation log. Copy the following statement. This statement is used to initialize the subsequent nodes.
Kubeadm join --token 11111.11111111111111 *.*.*.*:6443
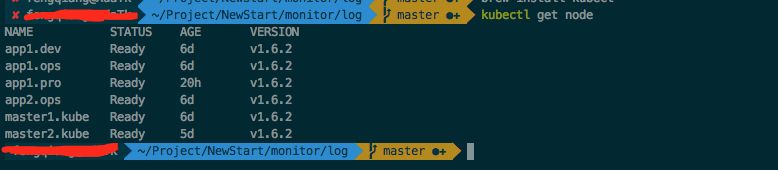
Next we can go and see the status of our K8S. I use this Mac. The students of Linux and Windows deal with it by themselves.
Install kubectl
Brew install kubectl
Then copy the /etc/kubernetes/admin.conf file on the master node to the ~/.kube/config of this machine.
After executing kebectl get node. I have installed it here, so I have all the information. If I can see the node, it will be successful.
Install network components
Next we install the network components. I am using flannel here. Create 2 files
Kube-flannel-rbac.yml
# Create the clusterrole and clusterrolebinding: # $ kubectl create -f kube-flannel-rbac.yml# Create the pod using the same namespace used by the flannel serviceaccount:# $ kubectl create --namespace kube-system -f kube-flannel. Yml---kind: ClusterRoleapiVersion: rbac.authorization.k8s.io/v1beta1metadata: name: flannelrules: - apiGroups: - "" resources: - pods verbs: - get - apiGroups: - "" resources: - nodes verbs: - list - watch - apiGroups: - "" resources: - nodes/status verbs: - patch---kind: ClusterRoleBindingapiVersion: rbac.authorization.k8s.io/v1beta1metadata: name: flannelroleRef: apiGroup: rbac.authorization.k8s.io kind: ClusterRole name: flannelsubjects:- kind: ServiceAccount name: flannel namespace: kube-system
Kube-flannel-ds.yaml
---apiVersion: v1kind: ServiceAccountmetadata: name: flannel namespace: kube-system---kind: ConfigMapapiVersion: v1metadata: name: kube-flannel-cfg namespace: kube-system labels: tier: node app: flanneldata: cni-conf .json: | { "name": "cbr0", "type": "flannel", "delegate": { "isDefaultGateway": true } } net-conf.json: | { "Network": "10.96.0.0/ 12", "Backend": { "Type": "vxlan" } }---apiVersion: extensions/v1beta1kind: DaemonSetmetadata: name: kube-flannel-ds namespace: kube-system labels: tier: node app: flannelspec: template : metadata: labels: tier: node app: flannel spec: hostNetwork: true nodeSelector: beta.kubernetes.io/arch: amd64 tolerations: - key: node-role.kubernetes.io/master operator: Exists effect: NoSchedule serviceAccountName: flannel Containers: - name: kube-flannel image: registry.cn-beijing.aliyuncs.com/bbt_k8s/flannel:v0.7.0-amd64 command: [ "/opt/bin/flanne Ld", "--ip-masq", "--kube-subnet-mgr" ] securityContext: privileged: true env: - name: POD_NAME valueFrom: fieldRef: fieldPath: metadata.name - name: POD_NAMESPACE valueFrom: fieldRef: fieldPath : metadata.namespace volumeMounts: - name: run mountPath: /run - name: flannel-cfg mountPath: /etc/kube-flannel/ - name: install-cni image: registry.cn-beijing.aliyuncs.com/bbt_k8s/flannel :v0.7.0-amd64 command: [ "/bin/sh", "-c", "set -e -x; cp -f /etc/kube-flannel/cni-conf.json /etc/cni/net. d/10-flannel.conf; while true; do sleep 3600; done" ] volumeMounts: - name: cni mountPath: /etc/cni/net.d - name: flannel-cfg mountPath: /etc/kube-flannel/volumes : - name: run hostPath: path: /run - name: cni hostPath: path: /etc/cni/net.d - name: flannel-cfg configMap: name: kube-flannel-cfg
Then use the command to configure.
Kubectl create -f kube-flannel-rbac.ymlkubectl create -f kube-flannel-ds.yaml
Start Node
Execute the following command on each of the 2 Node nodes.
Export KUBE_REPO_PREFIX="registry-vpc.cn-beijing.aliyuncs.com/bbt_k8s"export KUBE_ETCD_IMAGE="registry-vpc.cn-beijing.aliyuncs.com/bbt_k8s/etcd-amd64:3.0.17"kubeadm join --token 1111.111111111111 *.*.*.*:6443
For kubeadm join, please refer to the contents of starting the master node.
other
In theory, we installed here, K8S is already available. Next is the installation of the K8S Dashboard. It is for reference only and does not have to be installed.
Install DashBoard Tools
Create file kubernetes-dashboard.yaml
# Copyright 2015 Google Inc. All Rights Reserved.## Licensed under the Apache License, Version 2.0 (the "License");# you may not use this file except in compliance with the License.# You may obtain a copy of the License At## http://LICENSE-2.0## Unless required by applicable law or agreed to in writing, software# distributed under the License is distributed on an "AS IS" BASIS,# WITHOUT WARRANTIES OR CONDITIONS OF ANY KIND, either express Or implied.# See the License for the specific language governing permissions and# limitations under the License.# Configuration to deploy release version of the Dashboard UI compatible with# Kubernetes 1.6 (RBAC enabled).## Example usage: kubectl create -f
Create the file dashboard-rbac.yaml
Kind: ClusterRoleBindingapiVersion: rbac.authorization.k8s.io/v1beta1metadata: name: dashboard-adminroleRef: apiGroup: rbac.authorization.k8s.io kind: ClusterRole name: cluster-admin subjects:- kind: ServiceAccount name: default namespace: kube- System
After the implementation
Kubectl create -f dashboard-rbac.ymlkubectl create -f kubernetes-dashboard.yaml
Then use the following command to obtain the corresponding port number. Mainly to see NodePort:
Kubectl describe --namespace kube-system service kubernetes-dashboard
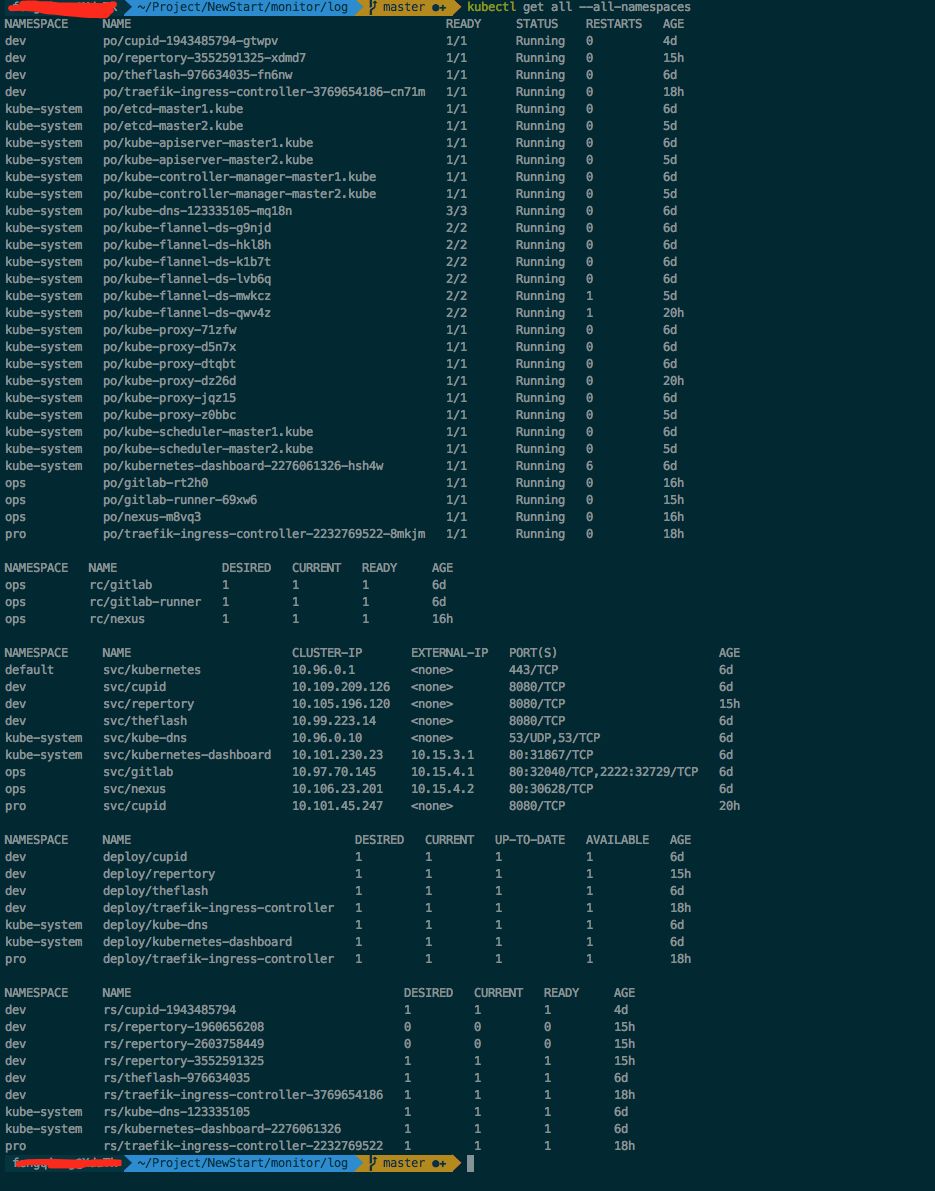
At this point, this installation tutorial is over here. Finally, you will receive a screenshot after installation.
Pcb Board,Circuit Board,Pcb Electronics,Custom Pcb
Cixi Zhongyi Electronics Factory , https://www.zybreadboard.com