The easiest way to connect two wireless routers
Requirements: At least one router must support WDS, but the brands of the two routers don’t need to match. In this guide, we’ll use two TP-LINK WR741 routers as an example, and the setup steps for other models will be similar.
In a typical WDS setup, one router acts as the main (or primary) router, while the other serves as the secondary (or slave) router. If one of your routers is older or doesn’t support WDS, it’s best to use that one as the main router and the newer one as the secondary. This helps avoid compatibility issues during the setup process.
Step 1: Configure the Main Router
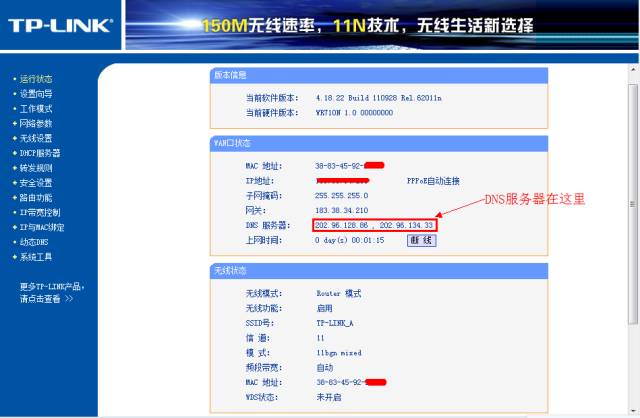
First, make sure that any device connected to the main router can access the internet normally. Then, log in to the main router’s web interface. Go to “Run Status†on the left menu bar to check the DNS server information under the WAN port status. You’ll see two DNS servers—primary and secondary. Write them down for later use.
Note: The main router should not enable WDS, as this could cause instability or conflicts with the network.
Next, go to “Network Parameters†> “LAN Port Settings.†Set the LAN IP address of the main router to 192.168.1.1, then save and restart the router.
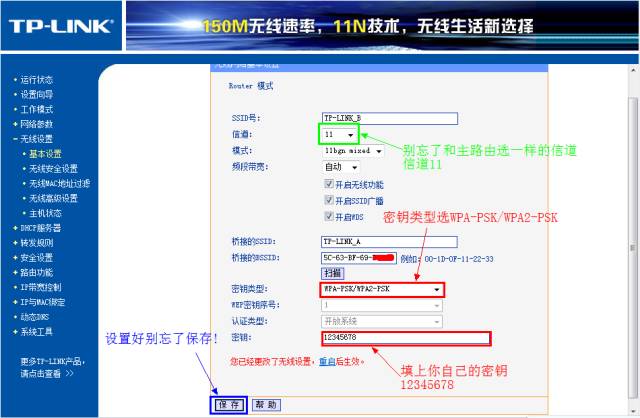
After rebooting, log back into the settings. Navigate to “Wireless Settings†> “Basic Settings.†Choose an SSID (e.g., TP_LINK-A), and select a channel manually—avoid automatic selection to ensure stable WDS performance. For this example, we’ll use channel 11.
Then, go to “Wireless Security Settings.†Choose WPA-PSK encryption and set a password (e.g., 12345678). It's recommended to use WPA/WPA2 for better security compared to older encryption methods like WEP.
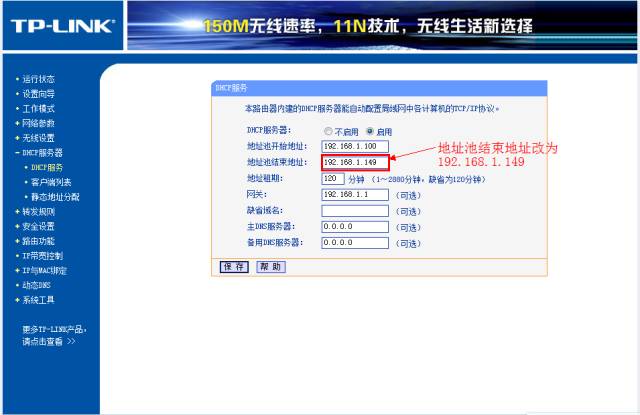
Finally, go to “DHCP Server†> “DHCP Server Settings.†Set the IP address range from 192.168.1.100 to 192.168.1.149. Save the settings and restart the main router. Your main router is now configured.
Step 2: Configure the Secondary Router
Log in to the secondary router’s web interface. Go to “Network Parameters†> “LAN Port Settings.†Change the LAN IP address to 192.168.1.2 to avoid IP conflicts with the main router.

Go to “Wireless Settings†> “Basic Settings.†Set the SSID to something different from the main router (e.g., TP_LINK-B), and choose the same channel as the main router (e.g., channel 11).
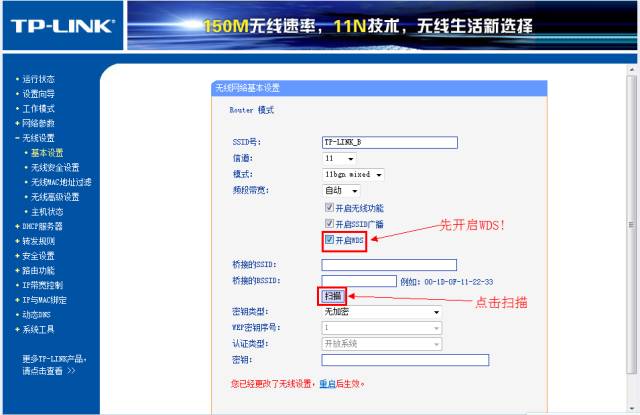
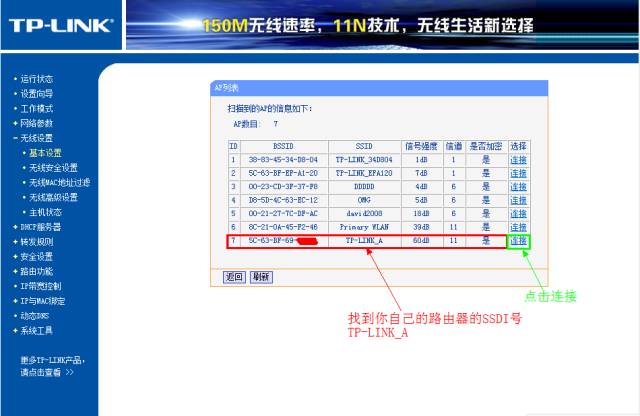
Enable WDS by clicking “Enable WDS,†then scan for available APs. Find the main router’s SSID (e.g., TP_LINK-A) and click “Connect.†Select WPA-PSK encryption and enter the same password used on the main router (e.g., 12345678). Save the settings.
Note: Many online guides skip a critical step here. If you don’t configure the DHCP server correctly on the secondary router, devices may not get an IP address and won’t connect to the internet.
Go to “DHCP Server†> “DHCP Server Settings.†Set the IP pool to 192.168.1.150–192.168.1.199 to avoid overlapping with the main router. Enter the main router’s IP (192.168.1.1) as the gateway and input the previously recorded DNS servers. Save and restart the secondary router.
Now, connect a wireless device to the secondary router and test internet access. If it still doesn’t work, double-check all previous steps.
If you need to add more routers, just repeat the process, changing the LAN IP address for each new router. Make sure all secondary routers have WDS enabled and are properly configured with the main router’s details.
Remember: If the main router has WDS or Bridge enabled, disable it first. Otherwise, the WDS function on the secondary router might not work properly.
Usb3.2 20Gbps Data Cable,Usb 3.2 Type-C,Usb3.2 Type-C Charging Data Cable,High-Speed Usb 3.2 Type-C
Dongguan Pinji Electronic Technology Limited , https://www.iquaxusb4cable.com