The easiest way to connect two wireless routers
Requirements: At least one router must support WDS, but the two routers don’t need to be from the same brand.
In this example, we are using two TP-LINK WR741 routers as a demonstration. The setup process for other router models is similar.
To begin, you’ll need two routers. One will act as the main (or primary) router, and the other as the secondary (or slave) router. If one of your routers is older or doesn’t have WDS capability, it’s best to use that one as the main router and the other as the secondary.
Step 1: Configure the Main Router
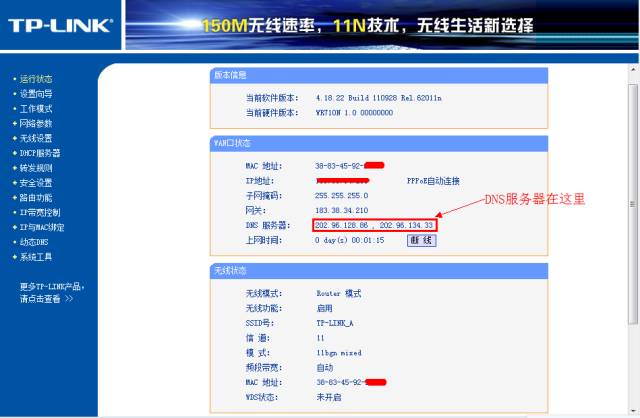
First, make sure that any device connected to the main router can access the internet normally. Then, log into the main router’s web interface. Navigate to the “Run Status†section on the left-hand menu. Here, you’ll find the DNS server information under the WAN port status. There are usually two DNS servers—one primary and one backup. Write them down for later use.
Note: Make sure the main router does not enable WDS, as this could cause issues with its normal operation.
Next, go to “Network Parameters†> “LAN Port Settings.†Set the LAN IP address of the main router to 192.168.1.1. Save the settings and restart the router.
After the reboot, log back into the settings. Go to “Wireless Settings†> “Basic Settings.†Choose an SSID (you can name it anything you like—this example uses “TP_LINK-Aâ€). Select a channel between 1 and 13, but avoid automatic selection to ensure stable WDS performance. In this case, we’ll use channel 11.
Then, go to “Wireless Security Settings.†Choose WPA-PSK encryption and set a password. For this example, we’ll use “12345678.†It’s recommended to use WPA/WPA2 instead of older encryption methods for better security and stability during bridging.
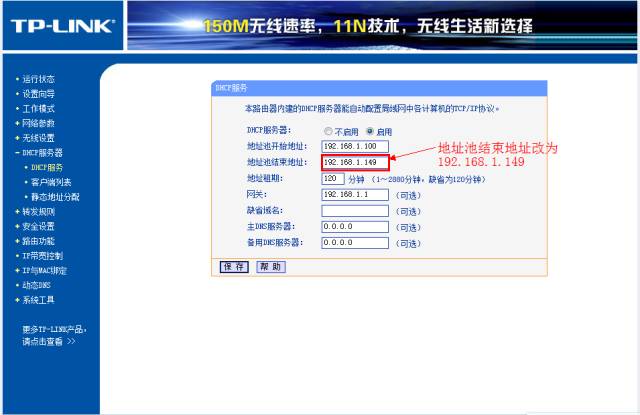
Now, go to “DHCP Server†> “DHCP Server Settings.†Set the starting IP address of the DHCP pool to 192.168.1.100 and the ending address to 192.168.1.149. Save and restart the main router.
Step 2: Configure the Secondary Router
Log into the secondary router’s web interface. Go to “Network Parameters†> “LAN Port Settings.†Set the LAN IP address to 192.168.1.2 to avoid conflicts with the main router and make management easier.

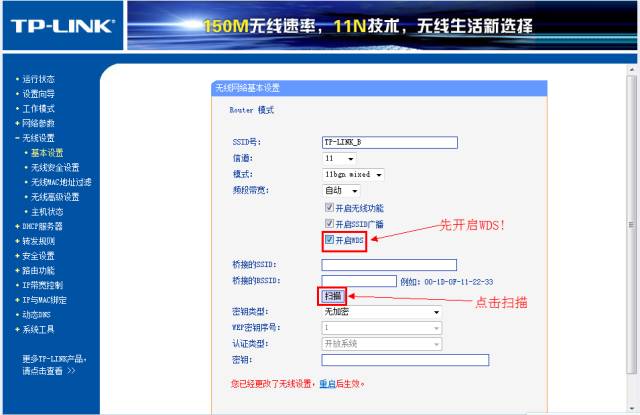
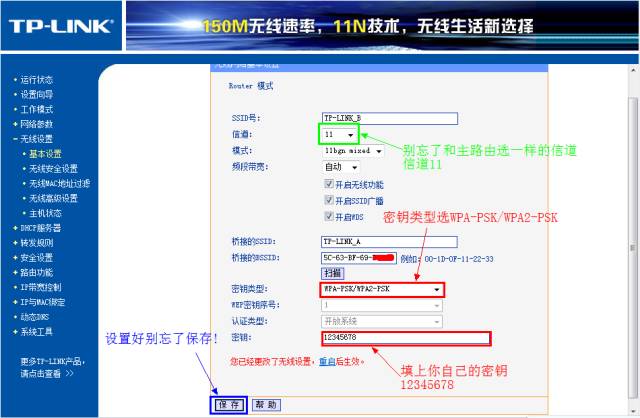
Go to “Wireless Settings†> “Basic Settings.†Choose a different SSID than the main router (e.g., “TP_LINK-Bâ€) and set the same channel as the main router (channel 11 in this example).
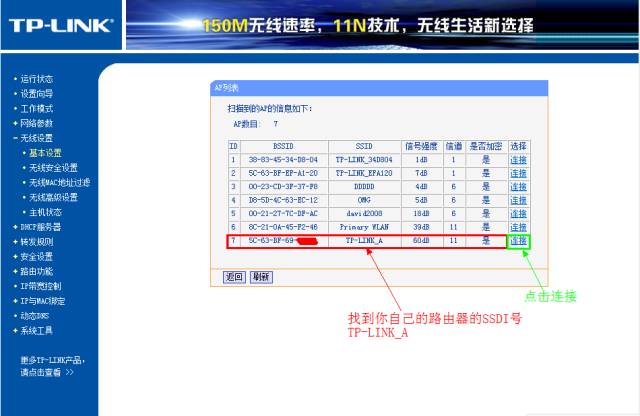
Enable WDS by clicking “Enable WDS,†then scan for available APs. Find the main router’s SSID (TP_LINK-A), select it, and click “Connect.†On the next screen, choose WPA-PSK encryption and enter the same password as the main router (e.g., “12345678â€). Save the settings.
Note: Many online tutorials miss a crucial step here. If you skip setting up the DHCP server on the secondary router, devices may not get an IP address and won’t be able to access the internet.
Go to “DHCP Server†> “DHCP Server Settings.†Change the start IP address to 192.168.1.150 and the end IP address to 192.168.1.199. Ensure this range doesn’t overlap with the main router’s pool. Set the gateway to the main router’s IP address (192.168.1.1). Enter the primary and alternate DNS addresses you wrote down earlier. Save and restart the router.
Go to “Wireless Settings†> “Wireless Security Settings†and set a password for the secondary router. You can choose the same password as the main router for convenience.
Once everything is set, connect a wireless device to the secondary router and check if it can access the internet. If it still doesn’t work, double-check all previous steps.
If you want to add more routers, follow the same configuration process, just change the LAN IP address accordingly.
Finally, keep in mind that modern WDS functions are more advanced than traditional bridging. So, all secondary routers should have WDS enabled and be configured to connect to the main router. If the main router already has WDS or bridging enabled, disable it first to avoid conflicts.
Pd Fast Charging For Iphone,Lightning Charging Cable,Usb C To Lightning Cable,Pd Fast Charger Apple Charger Cable
Dongguan Pinji Electronic Technology Limited , https://www.iquaxusb4cable.com