The Asus range of laptops is targeted towards the retail end-user market
and hence the demand for the full range of Asus Laptop Charger is very high.
Asus
laptop charger include Asus VivoBook charger series, ASUS Zenbook charger series,
Transforme Book charger series and so on. If you want to find a replacement power adapter for Asus laptop,
please feel free to contact us, we will help to select the correct OEM
replacement Asus
laptop adapter for you.
The common Asus laptop charger specifications have 12V 3A 44W,
19V 1.75A 33W, 19V 2.37A 45W 19V 3.42A 65W, 19V 4.74A 90W etc, and the dc tip
has 4.8*1.7mm, 4.0*1.35mm, 3.0*1.1mm, and special USB 6 pin, 40pin etc. Also
Yidashun can produce 45W 5V/12V 2A 20V 2.25A type c adapter for Asus
Yidashun's laptop adapter is with smart IC to protect your
laptop with over current protection, over load protection, short circuit
protection, over heat protection. And all our Asus laptop adapter is Brand New Replacement Product, works as Genuine parts, 100% OEM Compatible!!
Asus Laptop Charger,Asus Charger,Asus Computer Charger,Asus Notebook PC Charger Shenzhen Yidashun Technology Co., Ltd. , https://www.ydsadapter.com
The full article includes: 1. The latest ROOT tool for Huawei Carrier EC6108V9/EC6108V9U, Sichuan Telecom, Hebei Telecom, Guangdong Telecom, Hainan Telecom, Zhejiang Telecom, Chongqing Telecom, Jiangxi Telecom, Shandong Mobile, Qingdao Unicom and other operators All current latest firmware versions (as of June 10, 2016).
2. ITV account password backup tool, ROOT failure recovery system no longer need help 10000;
3. Built-in firmware backup and replacement tools, system downgrade arbitrary;
4. Wireless ADB (debug mode) open method allows you to remotely control the box from your computer or mobile phone;
5. Automatic policy routing configuration script upgrade to 3.x version, according to the current running APP automatically changes the default route, IPTVAPP go Telecom intranet, third-party APP go broadband Internet (thanks to Chengdu - Do not mess with Bainiu proposed Program), no longer need iplist file, automatically adapt to operators around (currently tested Sichuan Telecom, Chongqing Telecom, Hebei Telecom, Zhejiang Telecom),;
6. Some of the more common solution to the use of the box, including how to switch from the IPTV interface to the third-party desktop, how to adjust the TF card mount path to solve the problem that some applications cannot find the SDCard, and how to get the true resolution of the box from Change 720P to 1080P, how to change the box MAC address, and so on.
It took two months to start the first Huawei Wyatt Box and it was time for me to say goodbye to everyone.
Recently, I spent a lot of my spare time on the research of this box. But at the end of the year, I had more work on the job, and my wife and daughter couldn't leave behind at home. I really couldn't take care of it. (I didn't have much professional accumulation after all. Many problems even though google has reached the crux of the matter, but it needs to be converted into hands-on ability. It is necessary to further study relevant knowledge. It is often to search for information, find tools, and constantly try and error all night. Personal energy is limited, and many times people really feel that Determined to be weak.
In this "Ending", I will reorganize and release all of my harvest from this period of time, including the perfect solution for everyone's long-awaited "simultaneous online and offline network." After posting this post, I will finish the research on this box and return to normal life.
Thanks to the forum and the enthusiastic netizens in the group, your support will always be my driving force!
PS: Some friends suggested opening a group to facilitate communication. I feel that it is good, especially that the IP address database needs to be maintained from time to time. Everyone is more efficient and efficient, so I immediately built one.
Huawei's box problem communication group 461123864, enter the group code "box."
Please add Q group, do not harass the Q number of the same number!
Reminder: At present, the ROOT tool provides two brushing methods: computer version and U disk version. Local operators support the situation as follows.
U disk version is extremely simple to use, please give priority to use.
Carrier/hardware version
Hunan Telecom EC6108V9_pub_hnxdx
Hebei Telecom EC6108V9U_pub_hbjdx
Xinjiang Telecom EC6108V9U_pub_xjxdx
Zhejiang Telecom EC6108V9U_pub_zjzdx
ROOT Tool Final Edition (2016.02.02) Download:  iOTk1fDE0NjU5NzYzOTh8MjY3OTgyfDEyODY1ODY%3D" target="_blank">ROOT_EC6108V9U-U Disk Crack.zip (13.58 MB, Downloads: 1949)
ROOT_EC6108V9U_UDISK.zip is U disk version, used for recovery mode one-click brushing, 20 seconds to complete, simple and rapid (in the compressed package with detailed instructions, without reference to the following computer version of the ROOT process).
Root_ec6108v9u_final.zip for the computer version, used to test the operation mode, the more complicated steps, but there are multiple backup tools, stable and reliable (Sichuan Telecom ca hardware can only use this tool).
Remind again:
1. From the beginning of the second chapter are all the computer version of the operating process, U disk version, please directly view the description of the compressed package;
2. Regardless of which ROOT box you use, please unplug the network Cable and use WIFI connection when using a third-party application (if you are in trouble, please see the description of the dual-network function below). 
Second, the preparation work must be in place, do not mistakenly cut the firewood
2.1 Confirm the box software and hardware version Press the "Settings" button on the remote control, enter the operation code "6321", enter the box's setting interface, and then click "About" to view the box's software and hardware versions. 
2.2 Download the required firmware (optional steps, skippable)
The firmware is downloaded for the external card reader and replace the built-in firmware (see Sections 5.2 and 7.1 below). Under normal circumstances, you can not do this step.
According to the information gathered by users all over the world, there are actually two different hardware versions of the Huawei Wyatt Box EC6108V9U, namely the ca version with advanced security features and the pub version without advanced security features. Currently known ROOT tools can be common, but the two hardware versions of the firmware can not brush each other (pub version can brush each other).
Therefore, when you download the firmware, you must not only select the corresponding operator, but also need to find the right hardware version.
Existing firmware list:
Chongqing Telecom EC6108V9U_pub_cqydx: CQD01B016 (factory)
Guangdong Telecom EC6108V9_pub_gdydx: GDD01B013 (factory) → GDD03SPC100B011 (latest)
Hainan Telecom EC6108V9_pub_hnqdx: HID01B013 (factory)
Henan Telecom EC6108V9_pub_hnydx: HAD01B011 (Friendship Tip, if you restore the factory into a Hebei Telecom, please use this correct Henan Telecom firmware restore)
Henan Unicom EC6108V9_pub_hnylt: HAL11TB011 (Friendship Tip, if you restore the factory into a Hebei Telecom, please use this correct Henan Unicom firmware restore)
Hebei Telecom EC6108V9U_pub_hbjdx: HED01B012 (factory) → HED01B014 (latest)
Qingdao Unicom EC6108V9U_pub_qdllt: QDL01B011 (factory) → QDL01B013 (latest)
Shandong Mobile EC6108V9U_pub_sdlyd: SDY01B013 (Factory)
Sichuan Telecom EC6108V9U_ca_sccdx: SCD11B011 (factory) → SCD12B011 (latest)
Sichuan Telecom EC6108V9U_pub_sccdx:SCD01B015 (factory) → SCD05B011 (latest)
Zhejiang Telecom EC6108V9U_pub_zjzdx : ZJD10B013 (factory) → ZJD10TB013 (latest)
Huawei Wyatt EC6108V9U firmware download:
Link: http://pan.baidu.com/s/1pJCe6uB Password: ees8
2.3 essential items
1) One computer, with a line card;
2) Install telnet tool on this computer (Windows system can be installed in the "Telnet client" by selecting "Control Panel → Program → Enable/Disable Windows Function");
3) One network cable;
4) One TV (or monitor with HDMI interface);
5) A U disk (or memory card + card reader), and formatted as FAT32 format;
6) Download the ROOT tool (root_ec6108v9u_final.zip) and unzip it to the U disk root directory;
7) Download the latest firmware (update.zip) corresponding to your province and hardware version, and copy it directly to the root directory of the U disk without decompression.
8) Insert the U disk into the USB interface of the box;
Note that please carefully check the contents of the U disk, and compare with the following figure, do not have any omissions (including the currently empty backup folder). 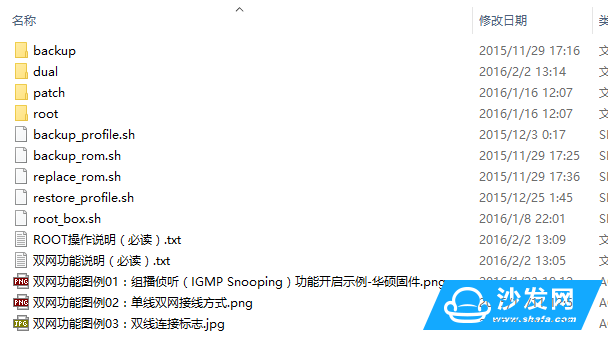
2.4 Non-required items
1) One mouse with USB interface, easy to copy and edit files in Explorer;
2) One USB interface keyboard for easy code input in terminal emulator;
3) One USB HUB, when you want to access U disk, mouse, keyboard, handle and camera at the same time, rely on it;
Third, learn to walk the back door, is an essential survival skills and equipment test mode is a back door Huawei left us in the equipment test mode we can directly obtain the highest authority. The ROOT tools, account password backup tools, etc. in this patch need to be run in the equipment test mode.
3.1 Set Huawei Wyatt as "equipment test mode"
1) Connect the box to the TV and turn it on. Press the "Settings" button on the remote control and enter the operation code 6321 to enter the settings interface.
2) Select “More†→ “Advanced Settings†and enter the operation code “6321†(Note: Different operators may have different operation codes, such as 8288 for Guangdong Telecom and 10010 for China Unicom);
3) Select "Equipment Test", enter the password "131022", and then select "Restart to enter the production test". At this time, the box will restart and the TV will show no black screen. 
1) Set the computer's wired network Adapter IP address to 192.168.1.X (X is any integer between 2 and 254), such as 192.168.1.88;
2) Use a network cable to connect the computer's network port with the box's network port;
Reminder: If you have another network card on your computer (such as a wireless network card on your laptop), temporarily disable or disconnect it.
3.3 Logging In to Huawei HUAWEI Box Through Telnet
1) Open a command prompt (type cmd on the run) window on the computer;
2) Enter the command "telnet 192.168.1.1" in the command line window and press Enter.
3) Enter login user name "root" at login and press Enter.
4) Enter password in Password (password is blank, press Enter directly); 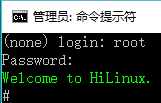
Note: The green prompt "Welcome to HiLinux" can be seen at this time, and the prompt number is visible. Then you can enter the command for subsequent operations. For those who are not familiar with Linux commands, I suggest you use the copy and paste method.
Fourth, get through the world line, starting from the correct installation of U disk
The necessary files for the ROOT box are saved on the U disk, so that the box can correctly read the file information on the U disk, which is a prerequisite for ROOT operation. Judging from the feedback from the previous people, many people have problems with the ROOT because the U-disc can't be installed. Therefore, this is specifically written in this place.
4.1 Viewing the U-Disk Device Name Enter the following command at the number prompt:
Ls /dev | grep sd
[color=rgb(51, 79, 103) !important]Copy Code 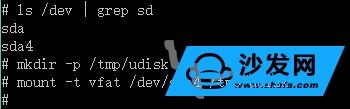
The above diagram exemplifies two device names. Generally, the device name with a digit behind it is a USB flash drive (in this case, sda4. On your box, it may be sda1, sdb1, sdc1, etc., etc. ).
4.2 Mounting a USB Flash Drive Enter the following command at the number prompt:
Mkdir -p /tmp/udisk
[color=rgb(51, 79, 103) !important]Copy Code
Mount -t vfat /dev/sda4 /tmp/udisk
[color=rgb(51, 79, 103) !important]Copy Code
Note: Please replace sda4 in the command with the device name you viewed in the previous step. Do not directly copy my example. If a "No such file or directory" error message appears, try other device names in turn. .
4.3 Confirm U disk mount Enter the following command at the number prompt:
Ls /tmp/udisk
[color=rgb(51, 79, 103) !important]Copy Code
If the U disk is mounted correctly, you will see the contents of root_box.sh, update.zip, and so on.
Fifth, do not consider winning before the first, please back up before ROOT
ROOT improper operation may lead to normal access to the box (usually shown as repeated reboot), although you can solve the problem by restoring the factory state, but with a side effect is the loss of ITV account information (starting IPTV applications stuck in 80%).
Now we will first back up the ITV configuration file, and then proceed with the ROOT operation without any worries.
5.1 Backing up the ITV configuration file (make sure to do this)
Make sure you have mounted the USB drive correctly, then type the following command at the number prompt:
Sh /tmp/udisk/backup_profile.sh
[color=rgb(51, 79, 103) !important] Copy Code When the prompt "Complete!" appears, the ITV configuration file in the box has been backed up to the U-disk backup folder.
5.2 Backup internal firmware (this step can be skipped)
A firmware is built into Huawei Box to restore the factory state. We can back it up for later use. Users in Sichuan and Hebei may not perform this operation. Firmware downloads have been provided in the posts.
Make sure you have mounted the USB drive correctly, then type the following command at the number prompt:
Sh /tmp/udisk/backup_rom.sh
[color=rgb(51, 79, 103) !important] Copy Code When the prompt "Copying ROM Files..." appears, the firmware is being copied. Please wait patiently for a while.
When the “Complete!†prompt appears, it indicates that the firmware in the box has been backed up to the USB flash drive's backup folder.
5.3 Replacement of Built-in Firmware (This step can be skipped)
The built-in firmware of Huawei Wyatt Box is often an older version, and the function is missing (such as Sichuan's factory firmware does not support home videophone), we can replace it with the latest firmware, and if it is restored to the factory state later Operation can reduce the trouble of upgrading again.
Similarly, we can also replace it with any one you want (as long as you have the corresponding firmware), upgrade, downgrade arbitrary, out of the box can only be restored to the factory version or upgrade to the latest version of the limit.
First of all, make sure that you have previously copied the update.zip file to the root directory of the U disk, then make sure that you have properly mounted the U disk, and then type the following command at the number prompt:
Sh /tmp/udisk/replace_rom.sh
[color=rgb(51, 79, 103) !important]Copy Code
When the prompt "Being Replaced ROM Files..." appears, it means that the firmware in the box is being replaced. Please wait patiently for a while. Don't interrupt it!
When the "Complete!" prompt appears, the built-in firmware in the box has been replaced with new firmware. 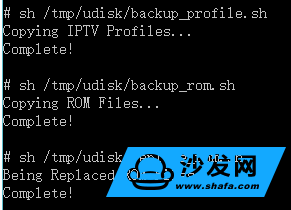
Sixth, running brothers, ROOT is so easy to see here, it is estimated that many of my friends have already had ten million mud horses in the heart. Indeed, ROOT was only mentioned in chapter 5 or chapter 6 of the water. I feel myself a bit embarrassed. However, in line with the purpose of “giving people what it takes to fish for fishingâ€, I hope that not only will you be able to ROOT your own box, but you will even be able to provide ROOT boxes on the Internet for paid services. If there are many details, If you don't explain clearly, don't you call my signboard. Hey~~
In fact, to this point, the remaining ROOT operation has been very simple.
6.1 Execute the ROOT script to ensure that you have properly mounted the USB drive, and then type the following command at the number prompt:
Sh /tmp/udisk/root_box.sh
When the text "Complete!" appears, the box has ROOT success.
6.2 exit the equipment test mode and restart (do not exit the correct black screen)
Enter the following command at the number prompt:
/root/factoryexit
[color=rgb(51, 79, 103) !important]Copy Code
Reboot
[color=rgb(51, 79, 103) !important]Copy Code
The box will restart and the Command Prompt window will say "Lost Connection to Host".
The landlord's Tucao: tutorial reminded more, there are still many people here do not operate correctly, leading to a black screen after the restart (ie, the box is still in the equipment test mode), and then scared to get the box broken. Here are two ways to remedy: First, re-telnet, and then perform the above two commands; second is to enter recovery, select the sixth reboot.
6.3 Setting “Sofa Desktop†as the Default Desktop Program Box After the box is restarted, “Select Home Screen Application†will appear on the screen. At this moment, you should first select “Sofa Desktop†and then select “Alwaysâ€. Do not select "IPTV". 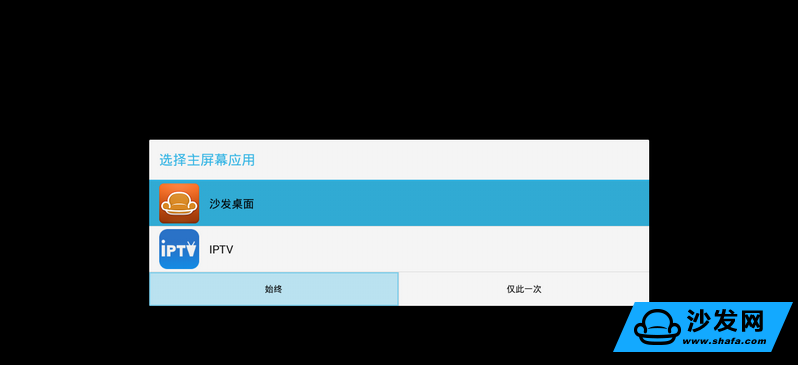
6.4 Updating SU Binary Files (Unable to Get ROOT Permissions Normally Without Update)
After the box is started, select “System Application†→ “SuperSU†on the sofa desktop. Follow the on-screen instructions to click “Continue†→ “Normal Modeâ€, and finally restart the box manually. Guangdong Telecom's box may fail to be updated here, but it does not matter, ROOT privilege has still been reached. 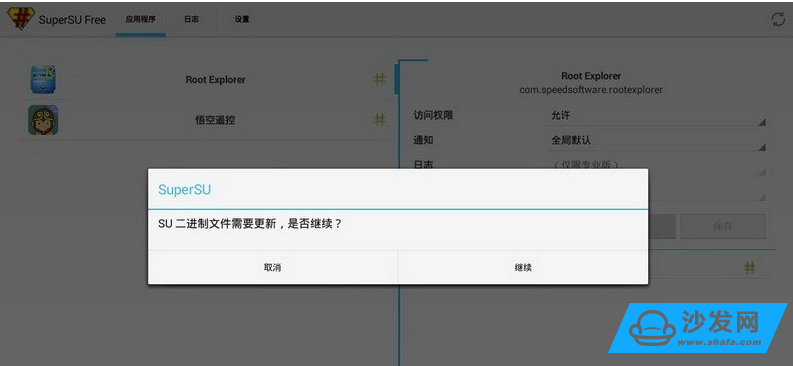
At this point, the ROOT operation has been completed. Your box can be installed and used any third-party applications.
6.5 Turn on "Allow installation of applications from unknown sources"
Friendly Tip: This option has been automatically enabled in the new ROOT tool released on 2015.12.25. This section can be skipped.
Found that many friends in the attempt to install the first application will be confused at this place by Huawei, so quickly add this section.
Under normal circumstances, if you use an Android device, you can install APKs from unofficial channels as long as you have enabled “Allow installation of applications from unknown sourcesâ€. However, Huawei's new version of firmware from Sichuan Wyatt has made a shadow here (I wonder if it is to deal with SARFT's request).
It seems that by default, "Allow" is selected. Actually, the "Allow" and "Prohibit" options are reversed! ! ! opposite! ! ! opposite! ! !
Therefore, we should first select "Prohibit" and then select "Allow" in the options that pop up below to truly enable "Install applications from unknown sources". 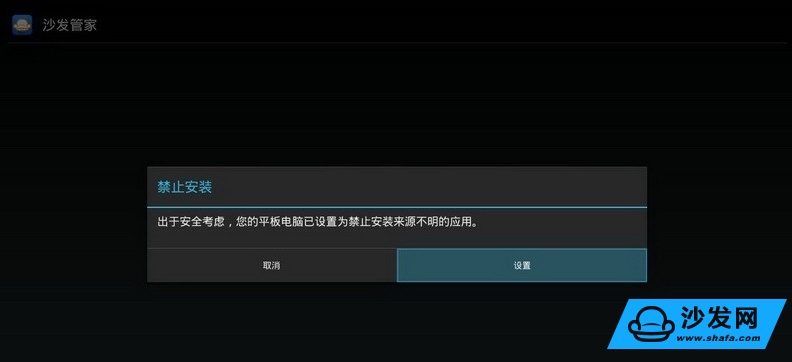
6.6 How to Switch Between Telecom IPTV and Sofa Desktops Opening the Telecom IPTV application from the sofa desktop is very simple. Click on the IPTV icon. But in turn, there is no entrance to the sofa's desktop in Telecom's IPTV. How do we operate it? Need to shut down and restart?
In fact, not so much trouble, there are two similar operations to switch from IPTV to the sofa desktop:
1) Press the "Settings" button first, and then press the "Home" button to enter the sofa table; 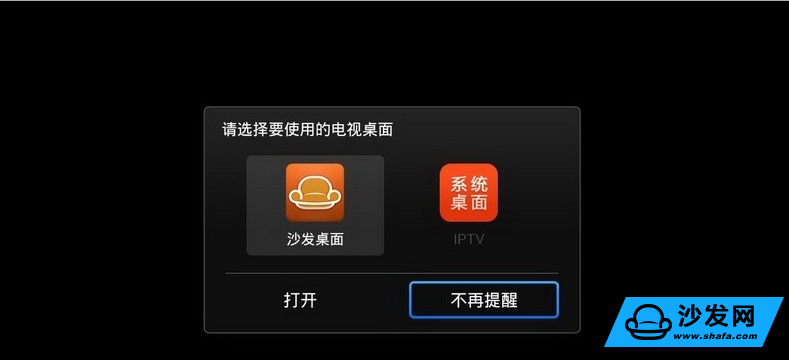
Note: The first time you do this, a desktop selection window may appear. Remember to select "Sofa Desktop" + "Not to Remind".
2) Press "Local" button first, then "Home" button to enter the sofa desktop (you can also directly select the application you want to use on the local page);
Some of Huawei's original box remote controllers are simplified version without the “local†key. For this situation, the latest ROOT tool has changed the rarely used blue “information†key to the “local†key, but this change is rare. Invalid in firmware (such as Sichuan CD01B011).
It must be said that we have provided the function of directly returning to the sofa desktop by pressing the "menu" (option) key. Please look for update patches (limited to Sichuan firmware) in this post.
6.7 How to Disable System Upgrade Friendly Notice: In the new ROOT tool released on 2015.12.31, the system upgrade has been automatically blocked. This section can be skipped.
Taking into account that in the future Telecom may impose more restrictions in the new firmware, causing ROOT failure, so we need to temporarily shield the system upgrade. The method is simple:
Take a sofa housekeeper as an example:
1) Install the "Sand and Butler" app on the box first (It is recommended to cut off the network to avoid the upgrade test, and then use the U disk to install the Sand & Butler APK on the box);
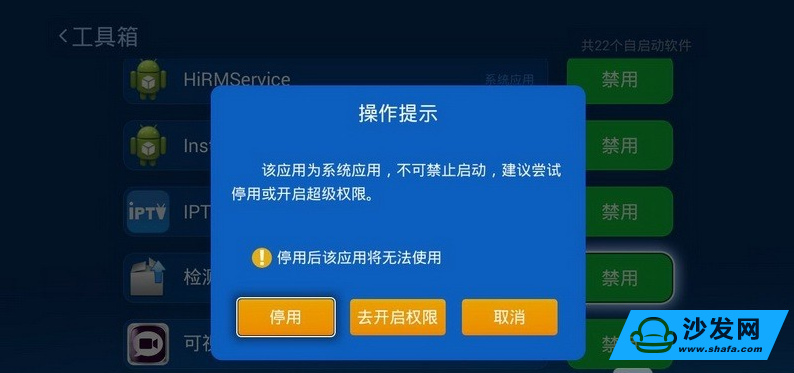
2) Go to Sand·Faders→Toolbox→Settings and set “Super Privilege†to “Onâ€;
3) In the SuperSU Authorization window that pops up, it is allowed to authorize the Sand-Sender.
4) Go to Sand·Faders→Toolbox→Startup Management, find the “Test Updates†item and set it to “Disabledâ€. 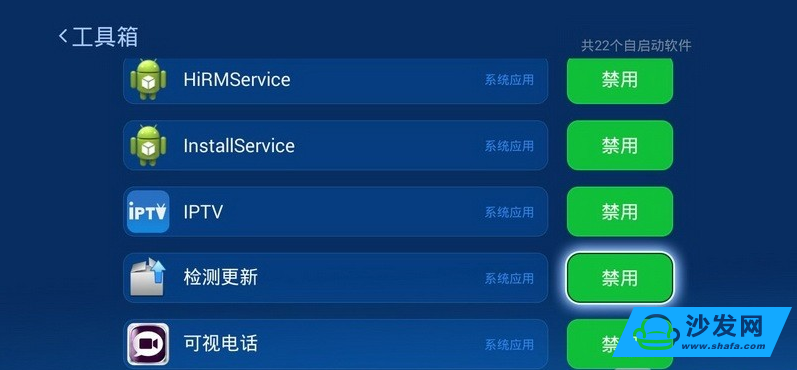
Special reminder: If you have already seen the upgrade prompts, do not panic, please unplug the network cable to restart. If only the WIFI connection still prompts the upgrade, temporarily disable the WIFI function on the router, or simply switch off the router to ensure that the network is completely disconnected.
Seventh, universal regret drugs! Three Ways to Recover Backups Remember some of the backups we made in Chapter 5? Let's experience the benefits of them now.
7.1 Brushing with Built-in Firmware If you have not replaced the built-in firmware, use this operation to restore to the factory version (downgrade).
If you replace the firmware according to the contents of Section 5.3, as long as you replace the firmware is an official release of any version (can be verified by signature), you can successfully brush in, upgrade, downgrade no problem, will not affect the ITV account and Installed third-party applications. Brush machine can be re-ROOT about.
The method is very simple, follow these steps:
1) Turn off the box with the power switch on the back of the box, and then turn it back on;
2) Press the “Standby†button on the remote control while powering on the box until the box enters Recovery mode.
3) Select the second item "Appy update from backup" in the Recovery menu. 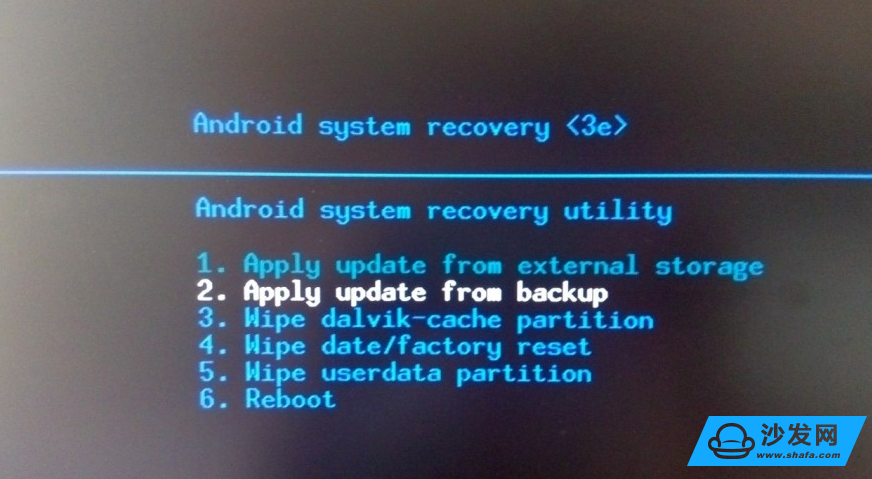
Currently I have provided two firmwares for each of the ca and pub versions of the box, namely the factory firmware and the current latest firmware.
If your box is upgraded in the future, you can use the rootexplorer application to copy the /cache/update.zip file kept in the box.
7.2 Using Firmware Brushes on External Storage Devices In general, because of the presence of built-in firmware, there is little opportunity to use the external firmware flash feature. However, taking into account the minimal possible firmware corruption and firmware version error when replacing the built-in firmware, this method should be mentioned as a remedy for the critical moment.
The method is also very simple, and there is only one more step compared to the operation of the built-in firmware flasher:
1) Copy the update.zip file to the U disk (the path between the CA version and the PUB version is slightly different), and insert the U disk into the USB interface of the box;
CA version: Copy the update.zip file to the U disk root directory;
PUB version: Create a new folder "upgrade" on the root directory of the U disk, copy the update.zip file to this folder;
2) Turn off the box with the power switch on the back of the box, and then turn it back on;
3) Press the "Standby" button on the remote control while powering on, until the box enters Recovery mode;
4) Select the first item "Appy update from external storage" in the Recovery menu. 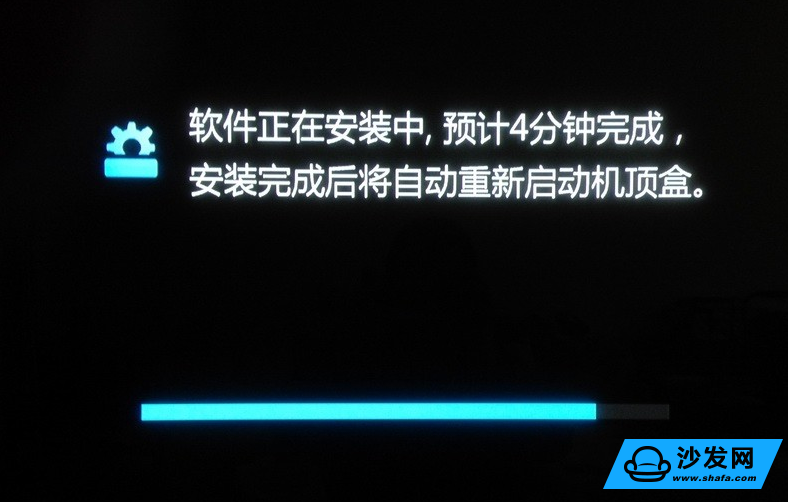
It must be noted that not all firmware can support this method. At present, it is known that the factory firmware can perform an external card reader, and other versions of the firmware have yet to be verified.
7.3 Restoring ITV Profiles After Flashing In normal circumstances, normal brushing operations, whether upgrading or downgrading, will not affect ITV profiles. However, if there is a mistake in ROOT or if WIPE is performed in Recovery, the configuration file will be lost and ITV will not be able to use it normally (it will be stuck at 80% at startup).
In the past, we resolved this issue by calling the 10000 request to force the delivery of ITV data. However, this method is not timely enough. If we encounter customer service and maintenance staff who do not have experience in dealing with this issue, it is even more like chicken and duck. To respond effectively.
It is now convenient, as long as you backed up the ITV configuration file in the contents of section 5.1, then just after reflashing and ROOT, use the Root Explorer application to U disk (usually in /mnt/sda) in the backup folder in the "databases" Copy the "shared_prefs" folder to the /data/data/com.huawei.iptv.stb.stbconfig/ directory and overwrite the existing folder. 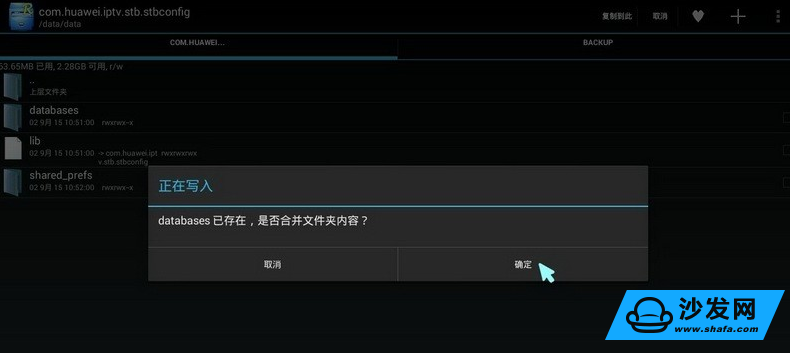
As a reminder, if you do not intend to perform ROOT after the flashing, then you cannot recover according to the above method. But you can enter the production test mode to operate. For details, please use the restore_profile.sh script, which will not be described here.
Eight, the two swords together, the ultimate meaning of the internal and external network at the same time online
The last time I wrote "Upgrade" wrote about to be completed, I found that the new version of the CD12B011 firmware actually has a very welcome change - wired and wireless can be connected at the same time (factory firmware will automatically turn off the wireless connection after a wired connection). So hurriedly ended the "Upgrade" of the writing, check the data, write the script code, and then spent 10 days to optimize and improve, there will be a first version of the dual-network script, the realization of the cable IPoE plus wireless WIFI The automatic policy routing configuration.
Surprisingly, after the release of this dual-line dual-network script, a netizen of Huawei's Wyatt Communications Group quickly tested the two-wire dual-network cable connection method with PPPoE and succeeded. Unexpectedly, another netizen provided a single-line dual-network (line only) implementation. After adding their results, the double-web script has made a qualitative leap in its functionality and it has reached the level of daily use.
However, the bigger surprise was still behind. The netizen as a senior Andrews development siege lion first proposed and practiced a new dual-network switching method. Inspired by him, the dual-network function was upgraded to version 3.0, according to the current The running APP automatically changes the default route. IPTVAPP takes the Telecom intranet and the third-party APP goes outside the broadband network. It no longer collects iplist files and automatically adapts to operators around the world. (Sichuan Telecom, Chongqing Telecom and Hebei Telecom are currently tested. Zhejiang Telecom).
What can it do?
There is no need for manual wire pulling and no manual switching of connection methods. Telecom IPTV and third-party applications can seamlessly switch and use it freely. There is no need to worry that the old and young will not use the ROOT box. 
It is considered that this is the most valuable content in the "Ending" chapter, and it is also the most difficult to write chapter because it involves some extremely boring knowledge points, such as the operation of the routing table. After repeated thinking, in order to spread to the masses, I decided not to explain it in depth here, but to explain the conditions of use, the principle of implementation, and the post-maintenance.
How to achieve the code, please friends of interest to view the contents of the auto-rules.sh script file, combined with the implementation principles described later in the article, I believe you understand it is not difficult.
8.1 Seriously warn me of the dual network patch script and Chengdu--not to be confused with the NetChange application developed by Bai Niu. There is a duplication of functions. Please do not use them at the same time so as to avoid conflicts.
For how to turn on/off the script, see below.
8.2 Special statement
1) The dual-network function is currently in the testing phase, which may affect normal use. Those who have no patience, no network infrastructure, and computer networks should bypass it.
2) Whether it is single-line dual-network (only line) or dual-line dual-network (cable + wireless), there are certain prerequisites to use. Please be sure to follow the instructions in "Preparation Items" below.
3) The double net script is already included in the latest ROOT tool, but taking into account the different network conditions and the possibility of conflict with other applications, the dual net function is disabled by default, and the method is to modify /system/etc/auto. -config.ini file, set the corresponding function switch to "1", effective after shutdown and restart (more details later).
4) Due to the defects of Huawei Wyatt itself, when using the dual-line dual-network function, especially after sleep/standby wake-up, it is easy to see that WIFI cannot be used. Do not open it. Personally recommend the use of single-line dual network.
5) The dual-network function is not a must-have feature. It is just the icing on the cake after ROOT. If you try it unsuccessfully, please do not try it repeatedly to avoid wasting precious time.
8.2 Implementation Principle (Using Dual-Wire Dual Networks as an Example)
The principle is very simple, the script immediately detects the current APP window name in the background, according to the conditions to determine the APP use which way to connect data:
1) When it is detected that the current APP window is an IPTV application, the default route is set to a telecommunication intranet, that is, a wired connection;
2) When the current APP window is not an IPTV application, the default route is set to the broadband external network, that is, the wireless connection.
The /system/etc/auto-rules.sh script monitors the APP and network connection status and automatically sets routing rules.
8.3 Preparations First of all, please use the ROOT box of the latest version of the tool I have provided (if ROOT has been used before, it is recommended that you redo the firmware and then ROOT once).
Next, depending on your needs, choose one of the following two ways:
8.3.1 Single-Wire Dual Network (Recommended)
1) Wiring has been done in a new way (see the attached figure), and it is ensured that in this mode the IPTV live broadcast (must be a live broadcast) can be viewed normally, and the router does not have data congestion when watching the IPTV live broadcast (eg WIFI cannot connect, Misallocation of other equipment's IP address, computer unable to connect to external network, etc.) 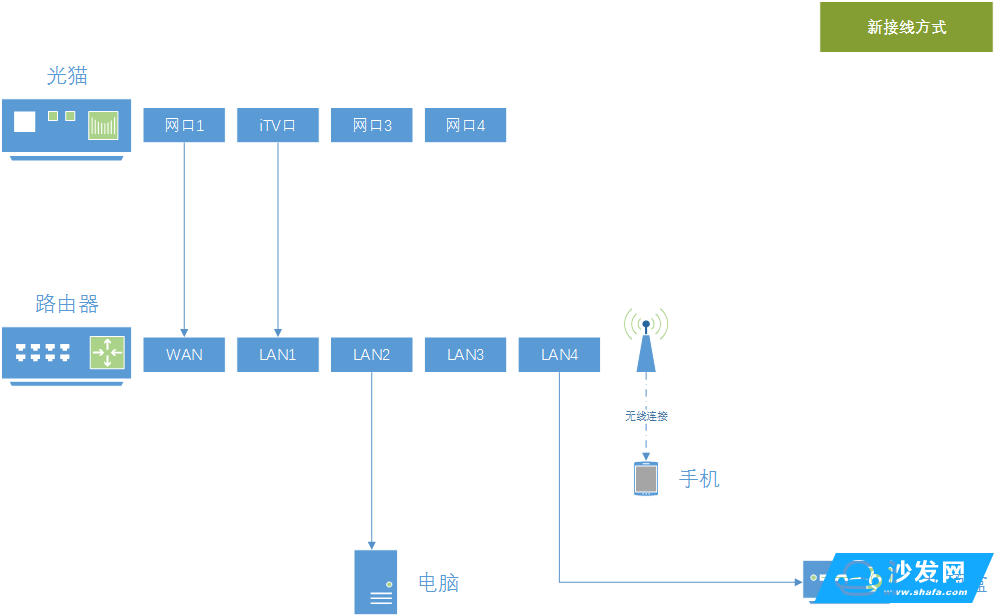
Reminder: This is a prerequisite, if not, please give up follow-up operations, because not all routers can support it.
2) Open the auto-config.in file in the "dual" folder on the U disk, and set "enable_single_line" (open single-line dual-network) to 1;
3) According to your network environment, continue to modify the auto_config.ini file single_ip (IP address), single_mask (subnet Mask ), single_gateway (gateway), single_dns (domain name resolution server) four items;
Reminder: If you do not know what the significance of this step, please give up the follow-up operation, so as not to delay everyone's time
4) Turn off the wireless connection in the system settings.
8.3.2 Double Line Double Network
1) Connect wired and wireless at the same time in the system settings (dual network connection logo will be displayed at network connection status); 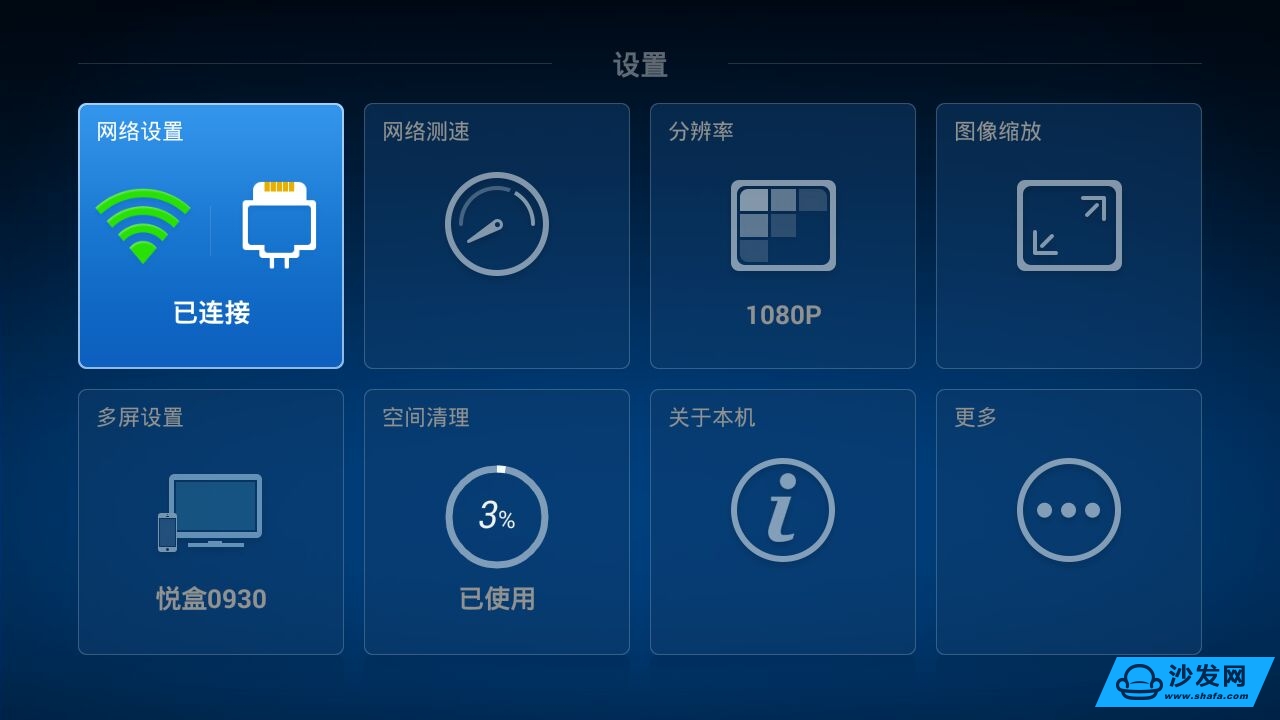
Note: Currently, only Sichuan Telecom's CD12B011/CD05B011 firmware supports simultaneous two-wire connection. Other provinces do not need to try again.
2) Set the "enable_double_line" item in the auto-config.ini file to 1.
8.4 Activate Use
1) Insert the U disk into the box, use the Root Explorer file manager application installed on the box, and copy the auto-config.ini file in the "dual" folder in the U disk (usually in /mnt/sda) to / In the system/etc directory, if the prompt file already exists, select overwrite the original file;
2) Because the box writing operation is not stable, please be sure to check whether the contents of the file just copied in is empty. If it is empty, please copy again (very important);
3) Press the power button on the back of the box to shut down (not the power button on the remote control), and it will take effect after restart.
After the restart, please open Telecom IPTV and any third-party video application. If all of them can be used normally, it means the dual network is normal.
8.5 How to close method one:
Modify the /system/etc/auto-config.ini file and set the corresponding dual network function to 0. The restart will take effect. This is the most standard method and it can be turned on at any time in the future. It is recommended for use.
Method Two:
Deleting the /system/etc/auto-rules.sh file directly is the most crude method. It is recommended that you feel comfortable with it.
Remind: If you need to enable it after deleting, you can find the auto-rules.sh file in the ROOT tool and copy it to /system/etc. Remember to turn off and restart will take effect.
8.6 Post-maintenance
The 3.0 version of the dual network patch released in 20160108 no longer needs to collect IP by itself. The content of this section is outdated and you don't need to look at it again.
Telecom provides a number of additional columns on IPTV pages, such as music, reading, games, education, and living. These columns are all present on different intranet servers. With the expansion of telecom services, the future will surely remain. Continue to open new sections. Therefore, the key to late maintenance is to add the IP address of the new intranet server to the auto-iplist.ini file at any time to ensure that these columns can be opened normally.
At the moment I am using a stupid way to find these intranet server IPs:
1) First install an application on the box: the terminal emulator, which is used to run some shell commands on the box;
2) Close the wireless connection, keep only the wired connection, then open the IPTV application, select a section and browse as much of the content as possible;
3) Return to the sofa desktop, open the terminal emulator, run the command "netstat -rm";
4) Find the connection information similar to this in the result displayed after running the command, such as 10.XXX → 182.XXX (this information indicates that the box is accessing the intranet server 182.XXX), and then add 182.XXX to the IP address list (iplist.txt);
5) Press the power button on the back of the box to shut down and restart, then turn on the wired and wireless connections (that is, enable the policy routing script), and then access the previous column again. If it is open, it means that the IP address we just added is correct.
6) If you open any errors (such as prompt account password wrong, play a black screen, no response for a long time, etc.), then run the command "netstat -rm" again to see if there is "192.XXX → 182.XXX" so Incorrect access to the intranet IP occurs. If yes, the corresponding IP is added to the IP address list. 
In the recent past, I have been repeating the above steps until all unnatural sections can be accessed normally. This is time-consuming and laborious. At present, I have accepted the suggestions of the netizens and established an exchange group. Everyone will work together to maintain, work together, and communicate with each other.
Nine, enjoy freedom, the vast world after ROOT
What can I do after ROOT? Is it just to be able to freely install third-party applications?
Of course, the answer is not, get the highest authority of the box, we can do a lot of things, fix bugs, improve performance, enhance functionality, and greatly increase the practicality and playability of the box. For example, the double net script mentioned above is needed to get ROOT permission to run. Next, we will have more advanced usages that will be presented to everyone after ROOT.
9.1 Use MENU (Option) button to completely exit IPTV application Before Huawei ROOT, Huawei VEN box can only be used to watch Telecom's IPTV program, so its IPTV application is not only bloated, but also in order to prevent users from exiting, it also monitors and The function of the "Home" key has been modified so that it always returns only the top page of the IPTV application. Now that we have ROOT, we have installed many other applications. Of course, we cannot allow IPTV applications to continue to behave as such. Must find a way to solve it.
In the previous section (section 6.6), we once introduced a simple method of returning Alice's desktop from IPTV. However, this method has drawbacks. It can't really exit IPTV applications, and it can't release a large chunk of memory occupied by IPTV applications. It consumes a lot of money. System resources make us experience poorly when using other applications.
Now, we finally have a very good solution. Thanks to Guogss (GYC) students studying around the clock, and finally have this "menu button to exit the IPTV application patch", it will currently idle in the IPTV application " The menu button is changed to the exit button. Simply double-clicking will completely exit the IPTV application and free up memory. The patch does not affect any function of the original IPTV application, and it will not affect other applications. Pressing twice to exit will also effectively avoid the possibility of misoperation. This is perfect. 
Menu button to exit IPTV application patch download:
Link: http://pan.baidu.com/s/1skdW0wd Password: fsci
Note: Before using this patch, be sure to check the documentation for the usage that comes with it.
9.2 Remove annoying passwords when entering settings Enter the new firmware of Huawei Wyatt to prevent ordinary users from entering the system settings, and add a password (opcode). Although we already knew that the password was 6321, but the unprovoked end pressed more than a few keys, it still feels bad.
Similar to the previous section, we can also use the replacement file to patch and remove this annoying password.该补ä¸åŒæ ·ç”±guogss(GYC)åŒå¦æ供,å†æ¬¡è¡¨ç¤ºæ„Ÿè°¢ã€‚
进入设置时去除密ç è¡¥ä¸ï¼š
链接:http://pan.baidu.com/s/1dEirVMx 密ç :djay
注æ„:出厂固件进入设置界é¢æœ¬å°±ä¸éœ€è¦è¾“入密ç ï¼Œå› æ¤æ— é¡»æ¤è¡¥ä¸ã€‚åªæœ‰æ–°ç‰ˆå›ºä»¶æ‰éœ€è¦ã€‚
9.3 将盒å的真实分辨率从720P更改为1080P
用很多应用(如安兔兔)å¯ä»¥æ£€æµ‹åˆ°ç›’å的真实分辨率为1280720(720P),虽然在使用IPTV和自带æ’放器时视频会自动调整到1080P,但如果使用第三方视频æ’放器(如MX Playerã€KODIç‰ï¼‰æ’放1080Pè§†é¢‘æ—¶ï¼Œæ— æ³•åšåˆ°ç‚¹å¯¹ç‚¹ï¼Œæ˜¾ç¤ºæ•ˆæžœè¾ƒå·®ã€‚ROOTåŽï¼Œæˆ‘们就有办法解决这一问题了。
特别声明:更改真实分辨率åŽï¼Œç³»ç»Ÿè‡ªå¸¦çš„IPTVã€åª’体ä¸å¿ƒã€ç³»ç»Ÿè®¾ç½®ç‰ç•Œé¢æœªèƒ½é€‚应新的分辨率,åªèƒ½æ˜¾ç¤ºåœ¨å±å¹•å·¦ä¸Šè§’四分之一处。介æ„者勿改ï¼
æ“作如下:
1) 首先,用Root Explorer应用打开/system/build.prop 文件,找到ro.sf.lcd_density=160 这一æ¡ï¼Œå°†æ•°å—160 改为240,ä¿å˜é€€å‡ºï¼›
2) 在盒å上安装一个“终端模拟器â€åº”用;
3) 打开终端模拟器,执行两æ¡å‘½ä»¤ï¼š
Su
[color=rgb(51, 79, 103) !important]Copy Code
wm size 1920x1080
[color=rgb(51, 79, 103) !important]Copy Code
æ¤æ—¶å¯ä»¥çœ‹åˆ°åˆ†è¾¨çŽ‡å·²ç»æœ‰äº†å˜åŒ–(dpi设置尚未生效,å—体大å°ä¸åˆé€‚),然åŽé‡å¯å³å¯ã€‚
PS: è¦æ›´æ”¹å›žæ¥æ¥éª¤ç›¸ä¼¼ï¼Œå…ˆæŠŠ240 改为160 ,然åŽç»ˆç«¯æ¨¡æ‹Ÿå™¨é‡Œé¢æ‰§è¡Œwm size 1280x720 。
特别è¦å‘Šï¼šç”±äºŽç›’å本身的缺陷,修改bulid.prop文件åŽå¯èƒ½å¯¼è‡´å…¶å˜ç©ºï¼ˆè¿›è€Œå¯¼è‡´æ— 法æ£å¸¸å¼€æœºï¼‰ï¼Œè¯·åŠ¡å¿…查看åŽå†å…³æœºã€‚ 如果事故已ç»å‘生,请进Recovery选择第二项æ¢å¤å‡ºåŽ‚固件å³å¯ï¼Œä½†ä¸è¦æ‰§è¡ŒWIPEæ“作。
9.4 æ— è£…å¤‡æµ‹è¯•æ¨¡å¼çš„情况下备份和替æ¢å‡ºåŽ‚固件很多地方è¿è¥å•†å¤„于安全方é¢çš„考虑,在固件ä¸åŽ»æŽ‰äº†è¿›å…¥è£…备测试模å¼çš„é€‰é¡¹ï¼Œå› æ¤å°±æ— 法使用我在上é¢æ供的固件备份和替æ¢è„šæœ¬ã€‚对于æŸäº›æŠŠå†…置固件æžé”™äº†å¼„出大笑è¯çš„è¿è¥å•†ï¼ˆæ¤å¤„指的就是河å—电信ã€æ²³å—è”通),这个éšæ‚£å°±æ— 法消除。
其实,在我们对盒åROOT之åŽï¼Œæˆ‘们已ç»å¯¹è¿™ä¸ªç³»ç»Ÿå·²ç»æœ‰äº†ç”Ÿæ€å¤§æƒï¼Œå¤‡ä»½å’Œæ›¿æ¢å›ºä»¶åªæ˜¯å°äº‹ä¸€æ¡©ã€‚
æ“作如下:
1) 首先,拔掉盒åä¸Šçš„ç½‘çº¿ï¼Œä½¿ç”¨æ— çº¿è¿žæŽ¥å®¶ä¸çš„路由器,连接æˆåŠŸåŽï¼ŒæŸ¥çœ‹ç›’åçš„IP并记ä½ï¼ˆå½“然,其实有线连接也是å¯ä»¥çš„,关键是è¦æœ‰ä¸€ä¸ªå¯è¿žæŽ¥çš„局域网IP);
2. 在电脑上打开命令æ示符窗å£ï¼Œè¾“入命令telnet 192.168.1.222 (æ¤å¤„就填上一æ¥æŸ¥çœ‹åˆ°çš„ç›’åIP,别跟ç€æˆ‘用222);
3. æˆåŠŸç™»å½•åˆ°ç›’ååŽï¼Œå†ä¾æ¬¡æ‰§è¡Œä¸‹é¢ä¸¤æ¡å‘½ä»¤ï¼ˆæ³¨æ„å·ä¸éœ€è¦è¾“入)
mkdir /tmp/rom
mount -t ext4 /dev/block/mmcblk0p13 /tmp/rom
4. 现在转到盒å上,使用Root Explorer应用,打开/tmp/rom 目录,如果一切顺利的è¯ï¼Œä½ 会å‘现一个update.zip 文件,这个就是内置的出厂固件;
5. çŽ°åœ¨ä½ å¯ä»¥åœ¨ç›’å上æ’入一个U盘(U盘的路径为/mnt/sda),就å¯ä»¥æŠŠå‡ºåŽ‚固件å¤åˆ¶åˆ°U盘或者用U盘上的文件替æ¢å®ƒäº†ï¼›
PS: å¦‚æžœä½ å¯¹Linux命令比较熟,直接用命令完æˆç¬¬4ã€5æ¥ä¹Ÿè¡Œï¼Œä¾‹å¦‚å¤åˆ¶å‡ºåŽ‚固件到U盘
cp -f /tmp/rom/update.zip /mnt/sda/sda4


Huawei Wyatt (EC6108V9U) crack ROOT and use experience ultimate tutorial!
U disk version
PC version
Remarks Beijing Unicom EC6108V9U_pub_bjjlt √
√
Chongqing Telecom EC6108V9U_pub_cqydx √
√
Guangdong Telecom EC6108V9_pub_gdydx √
√
Please upgrade to the latest firmware GDD03SPC100B011 Hainan Telecom EC6108V9_pub_hnqdx √
×
When the latest firmware is booted, the system is tampered with, but it does not affect the use of Henan Telecom EC6108V9_pub_hnydx √
×
If there is no sand-to-desktop desktop after ROOT, please press the information button to run Telecom iTV, update reboot to Henan Unicom EC6108V9_pub_hnylt √
×
√
×
√
√
Jiangsu Telecom EC6108V9_pub_jssdx √
?
This model did not personally test, it is also unknown whether to bring equipment test mode Jiangxi Telecom EC6108V9U_pub_jxgdx √
×
Qingdao Unicom EC6108V9U_pub_qdllt √
√
Shandong Unicom EC6108V9U_pub_sdllt √
√
Shandong Mobile EC6108V9U_pub_sdlyd √
√
Shanghai Telecom EC6108V9 (founded by ca) ×
×
Magic users please use adb way to crack, can not use the tools provided by this post Sichuan Telecom EC6108V9U_pub_sccdx √
√
Sichuan Telecom EC6108V9U_ca_sccdx ×
√
Cup of Sichuan ca users, please take a look at it Tianjin Unicom EC6108V9U_pub_tjjlt √
√
√
?
√
×
More Huawei Wyatt crack tutorial please pay attention to the sofa network (); Huawei box discussion area (http://bbs.shafa.com/forum-51-1.html); if the problem is not resolved, you can join the Huawei box to break the exchange Group: 461123864, by the moderator to help you solve the puzzle!